How to do a new extender setup
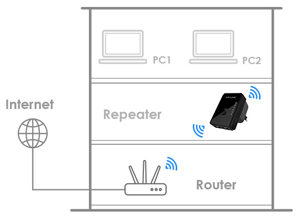
Installing an extender as a companion for range to your existing wireless router is the best thing you could do to extend the range. Well if you are a first time user and you do not know the how to’s of the extender you have come to the right place. Let’s see what you will need to do in order to set up your very own first wireless router range extender
Follow these steps in order to complete the setup
- Bring out your extender and connect it to a power supply to start it up.
- After it starts up connect it to your laptop or mobile using the wireless connection
- You can also connect it to your Personal computer using an Ethernet cable
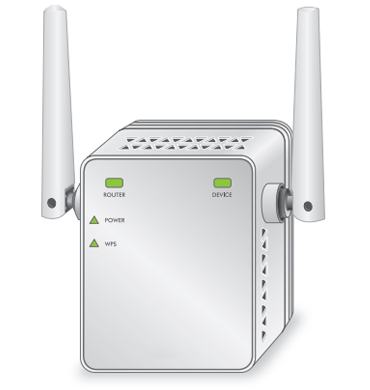
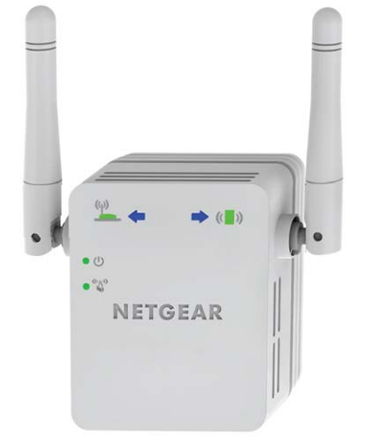
- After you do that you can see that the LED on the extender will denote a connection.
- You may then log in to your browser on your computer and visit the offline setup link.
- You could find it via www.mywifiext.net or by just entering the IP address of the extender.

- You will be able to find the IP address of the extender on the box as well as the rest end of the extender.
- After that you will be required to fill in the default admin name and password.
- Once you’re successfully logged in you can add you router by filling in the details such as the SSID and password.
- This will program your extender to connect to your router and relay the network.
Please do note that the extender should be programmed with the right credentials from your existing router. Failing to do so will lead to the extender not being able to connect to the router. In such a case where you enter wrong details of your router you can always reset the extender and reprogram it from the beginning.
Let’s compare a few models of Netgear extenders and their setup mechanisms.
Let’s talk about the New extender ac1200 setup. Now, this extender is a bit more on the heavy duty side and is a dual band extender. This implies that the extender can be switched from a 2.4ghz channel to a 5 GHz channel based on your priorities. A 2.4 GHz channel will be perfect for casual internet browsing while the 5GHz channel will come in handy in times of heavy downloads or high quality streams.
The setup mechanism is almost identical as the one we discussed before. The AC 1200 extender though, has a far better range and power. You could also setup the extender via the one button WPS setup method where all you need to do is to press the WPS button on the extender as well as the router in quick succession. The LEDs will guide you on the process and blink in particular ways to show if the connection is in process, successful or a failure.
New extender EX2700 Setup
EX2700 extender is comparatively smaller and very compact. It’s size and a few compromises on the range and speeds makes it quite affordable for a small household. It has been truly designed to fit in and sports a simple plug and play feature in case you were wondering. The extender can be set up by connecting it with a personal computer and then using the setup link as mentioned above.
The setup link can also be put to use when you need to restart, reset or even troubleshot the extender. It has two external antennae sticking out from it’s sides. They could be potential turn offs on design but the range might get compromised even further should they be removed.
Well, I suppose you have to lose something in order to gain another. Here a little bit of a compromise on design will fetch you a handsome range on a normal price. It definitely sets a benchmark for competition.
New extender AC750 Setup
Now we’ve been taking about a compromise on design haven’t we.? In this version of the Netgear extenders you can compromise a little bit on the price tag or maybe on your budget should is say and gain both adequate range and a sleek and modern design. You could easily set it using the on browser or the WPS setup. This makes it a very convenient and reliable option. You could also use the IP address in order to reach the offline link.
New extender N300 Setup
If you wanted a smaller and more compact version of a power packed extender that could help you in removing those annoying Wi-Fi dead spots, then the n300 is the best option for you. It is a single band extender that only sports a 2.4 GHz channel but packs a real punch for it’s budget range. The setup is identical in all ways. You could use the wired or wireless connection to connect it to your personal computer and then use the offline link and follow the instructions mentioned above.
The extender has a range of an approximate 10m if not many hurdles are present. It can also sum up speeds of up to 300 mbps. Speeds like these can make you seamlessly browse through your internet routine. The LED lights also have a wide variety of functions that can be used. The LEDs denote connections as well as strengths of the connections. This can be made use of while deciding a place for the extender. Always try to choose a central location for your extender so that it gets to cover the maximum range possible.
To deal with the issues on your extender you could use the trouble shoot option in the setup link or just try to run a power cycle. If the lower cycle doesn’t work you can try going for the reset option. You can reset the extender by using the reset button on the extender or using the option in the setup link. Both are very convenient ways of getting rid of potential bugs and issues.
Ap.Setup
Ap.Setup is an offline web page where you can configure your Wifi extender of any brand pretty easily within few minutes. If you wish to improvise the extender’s wireless setting, you can do the same in the dashboard available through Ap.Setup. Next time onwards, browse the assigned IP address of the extender by your router to login to your extender’s settings page. After setup you can access the internet from any corner of your house at the router’s original bandwidth.
You can configure AP.Setup with extenders from most of the brands in the following ways:
- Connect to the Extender’s Network (Wireless_N, Wireless_AC, Etc)
- Switch on any device that can be connected to wifi.
- Look for settings options in that device.
- Select the wifi option and connect with the Extender Network.
- Now type http://AP.setup or 192.168.10.1 on the browser.
- Follow the next steps to connect your extender to the wifi.

At present, there are two modes available for configuring your extender: Extender and Acces point.
EXTENDER MODE
In extender mode, the range of the existing wireless signals is extended without the use of any wired setup. If your router has a WPS button, then you can add it to the extender by simply pushing the WPS on the router and the Extender. In case you wanna do it via browser then goto apsetup admin and start the configuration. Also if ap.setup doesn’t work then we recommend you first reset the extender and then start the setup
ACCESS POINT MODE
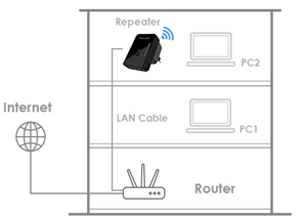
In access point mode, the extender is connected to the router via a wired connection. Also, make sure for this setup you toggle the switch ob the repeater to the AP mode and then start the configuration. Once ethernet is connected from extender’s LAN to the router’s LAN then go to http //ap.setup admin to begin the setup. On the apsetup wizard page select “Access Point” as your mode.
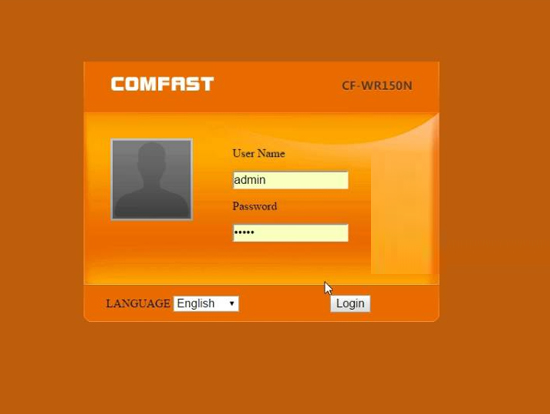
Configure Comfast Extender with browser
Though the configuration is quite easy, yet users may find it difficult for the first time. Please go through the two following ways to ease the process.
An extender can be configured in two ways as follows:
1.WPS (WiFi Protected Setup) Method

- Connect the comfast extender to a stable source of electricity and make sure the indicator turns steady.
- Press the WPS button on the router. At the same time, press and hold the WPS button(usually designed on the front side of the extender) till the indicator on the extender starts blinking.
- Once the light turns solid on the repeater that confirms successful configuration.
- To make changes in the repeater after setup, log into the router, and look for the repeater’s IP address in the router’s dashboard.
- Browse that IP address and log in with default credentials.
- In the setup wizard, select the required wireless name. Later you can change the credentials.
2.Comfast Web-Based Portal Setup
- Connect the extender to a stable source of electricity and make sure the indicator turns steady white.
- Select comfast_Extender_Setup on any of your wireless devices, showing up in the WiFi list.
- Browse for ap.setup/admin in the URL.
- An extender web-based portal window will appear on your screen asking for the default credentials. Use “admin” in both username and password.
- Select the existing wireless network on which you want to set up the extender.
- Log in with your WiFi credentials and change the extender’s name later on if you wish to.
- Apply these changes. And connect your wireless device to the new SSID of the extender.
- Connect your device with the new SSID of the extender and keep browsing seamlessly.
Configure Victony Extender in Repeater Mode
In this mode, the vast areas will be covered by fast speed internet overcoming the router’s limitation.
- Connect the device to the same wireless network to which the extender is connected.
- Browse the ap.setup/login URL. Log in with default credentials and choose repeater mode on the setup wizard.
- Select your WiFi and use the router’s password.
- Change the SSID later on. Apply the changes and connect your device to the new SSID of the extender.

Configuring the Victony WiFi extender via Ethernet cable:
- Browse http //ap.setup URL or just type 192.168.10.1 IP address
- Login to the victony extender’s setup wizard using default credentials.
- Choose the mode in which you want to configure the extender: repeater or extender and follow the on-screen prompts.
Configuring MSRM US300 Range Extender with ap.setup
For configuring MSRM US300 Range Extender, follow the steps as mentioned below:
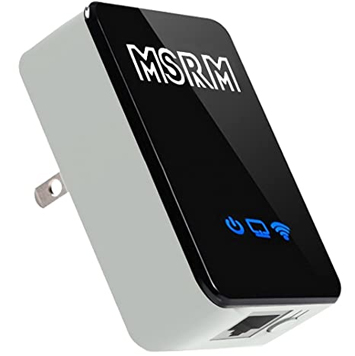
- Connect your extender to a non-fluctuating power source.
- Now, Connect it to your wireless device under the name “MSRM”. It should not prompt for a password.
- In your web browser, visit the website ap.setup.
- Now you need to log in using default credentials(“admin” for both username and password).
- Once you are logged in, select the method you like to connect for your Extender. Click on the Next button.
- Finally, select the router’s network name that you want to extend and type its password.
After the MSRM US300 setup is complete, you can unplug it use it at the location where you want the internet.
Open any browser and keep enjoying an uninterrupted high-speed network.
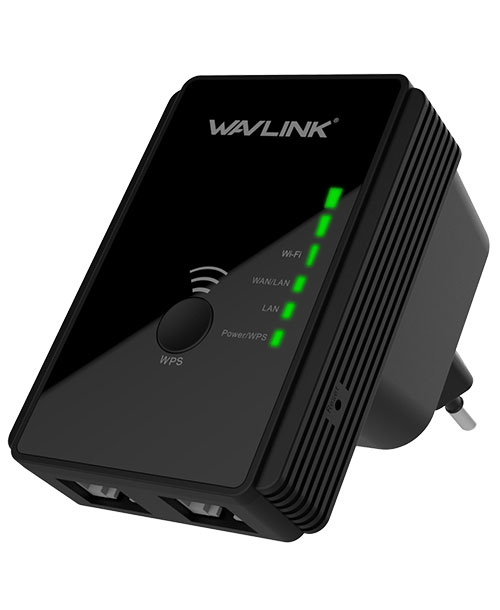
Wavlink Extender Setup
Extenders belonging to the Wavlink brand help to expand the network coverage and enhance the overall performance of your wireless network. They work best for the WiFi band of 2.4-5GHz and boost up the speed to 300Mbps reducing interference. They are compatible with any wireless device irrespective of laptop/notebook/mobile handset. Owing to their miniature design, you can carry one such extender with you wherever you go.
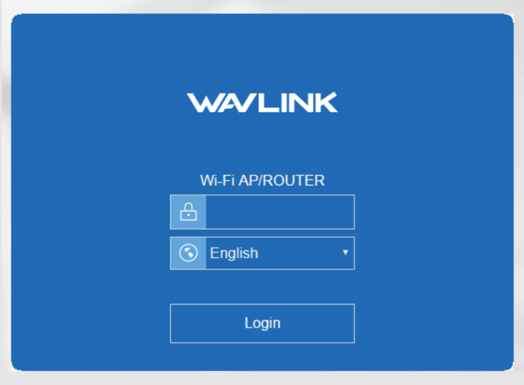
In order to configure with Wavlink Extender via Ap.Setup, go through the following steps:
- Connect your extender to a stable source of electricity.
- Switch on the extender in repeater mode(toggle the switch on the repeater to the repeater side)
- Now, turn on the wireless device and connect it to the extender network named “Wireless-N” it won’t require any password for connecting the first time.
- Go to the browser and search for http://ap.setup.
- Login with default credentials “admin” for both username and password.
- Thereafter follow the steps carefully as instructed to accomplish the setup.
Still, some users may face challenges. Few such challenges are documented here:
1. The device may not be connected to the same WiFi as that of extender.
Solution: Make sure your device is connected to the extender’s wireless network i.e. Wavlink_Extender.
2. Ap.Setup interface is not responding.
Solution: AP.Setup is an offline webpage. You can also use default IP: 192.168.10.1 instead in the URL.
3. The browser may not be compatible.
Solution: Your web browser should be up-to-date in order to access http //ap.setup admin.
4. Login credentials may be wrong.
Solution: Use default credentials( “admin” in both username and password).
5. The extender is not configured properly.
Solution: Connect your extender and your computer via Ethernet cable. If it still fails, reset the extender in the following ways:
- Disconnect and plug it to a necessarily stable electric connection. After the power light turns stable press the reset hole for around 10 seconds while the extender is still plugged in to the wall. While holding the pin inside the reset hole the colour of the power light will change. This should factory reset it.
- Browse the web-based interface of the extender, or just type http://192.168.10.1 IP address. Log in with default credentials and look for advanced settings. Choose the reset option from here.
6. Indicator LED lights are not working on the Extender.
Solution: There can be 3 types of LED in the extender:
i.) Power LED:Once you plug in the extender to a power source, this should blink up.
ii.) Ethernet LED:
Once you connect your device to extender via ethernet cable, this lits up.
iii.) Internet LED:
Once the extender gets connected to the router this LED light should become stable.
iv.) Wi-Fi LED:
Once the internet packets start transmitting/receiving signals, this LED comes up.
v.) WPS LED:
Once the WPS setup is authorized, this light blinks.
To summarize, Ap.Setup simplifies the extender set up for a wireless device and intensifies the overall performance of the router.